
OpenCV (Open Source Computer Vision) is a library of programming functions mainly aimed at real-time computer vision.
OpenCV library cannot be set up on windows with the already available .exe's.
It has to be built using software like CMake.
CMake is cross-platform free and open-source software for managing the build process of software using a compiler-independent method.
To build it, MinGW has to be downloaded & installed.
MinGW (Minimalist GNU for Windows), formerly mingw32, is a free and open source development environment for Microsoft Windows applications.
Step 1 :-
Download source code of OpenCV from Github.
Link - https://github.com/Itseez/opencv
Download it as zip for v3.0.
Step 2:-
Extract its contents to opencv-master folder.
Step 3 :-
Create a folder "opencv" in C:\.
Step 4:-
Place opencv-master folder in the "opencv" folder.
Step 5:-
Download MinGW from http://sourceforge.net/projects/mingw/files/
Install it.
A folder MinGW will be created in C:\
Step 6:-
Launch MinGW.
From the options install mingw32-base and mingw32-gcc-g++.
To install, right-click on the check-boxes & click Mark for installation.
On the menu bar, click on Installation > Apply Changes.
The required compilers will be installed.
Step 7:-
In environment variable "path", add "C:\MinGW\bin"
Step 8:-
I worked with Eclipse Helios with CDT. So, you can download that too.
Once its zip file is downloaded, extract it into a folder.
Create a folder "eclipse CDT" in C:\
Place the extracted folder in "eclipse CDT".
Step 9:-
Its time to create OpenCV for Windows from its source code.
For this, CMake has to be installed.
You can download it from :-
http://www.cmake.org/download/
I downloaded cmake-3.2.2-win32-x86.exe
Install it.
It doesn't ask for anything special.
Step 10:-
Launch cmake-gui.
In the source-code folder, choose "C:/opencv/opencv-master/opencv-master"
For binaries, type "C:/opencv/build/x86/mingw"
Step 11:-
Click on configure.
It asks for compiler.
Choose Eclipse CDT4 - MinGW Makefiles.
Step 12:-
After configuration is done, the window turns reddish with some options.
Keep them as it is except -
Uncheck WITH_IPP if it is checked.

Step 13:-
Now, click on Generate.
Once it says "Generating done".
Open command prompt.
Step 14:-
Open Windows explorer & navigate to path "C:\opencv\opencv-master\opencv-master\cmake\OpenCVCompilerOptions.cmake"
Open it.
Search for "add_extra_compiler_option(-Werror=non-virtual-dtor)" and add a # before it to comment it out.
Step 15:-
Navigate to path "C:\opencv\build\x86\mingw".
Type "mingw32-make install"
This is a time taking process.
It should not throw any errors. But,if it throws any errors, please comment and ask so that I can help.
Add "C:\opencv\build\x86\mingw\bin" to path variable in environment variables.
Open windows explorer.
Navigate to "C:\opencv\build\x86\mingw\lib".
Open files "libopencv_highgui300.dll.a","libopencv_imgproc300.dll.a", "libopencv_core300.dll.a", "libopencv_imgcodecs300.dll.a" one-by-one through any text editor and save them with .lib extension to the same folder.

A successful completion of this process calls for celebration.
Step 16:-
Open Eclipse CDT.
Click on ....File > New > C++ Project.
Step 17:-
Name your project and make a blank project.
From the right, choose MinGCC compiler and click on Finish.

Step 18:-
You must be able to see some MinGW folders in Includes folder of your project.
Now, lets include OpenCV in our project.
Right click on project in the project explorer and click on properties.

Step 19:-
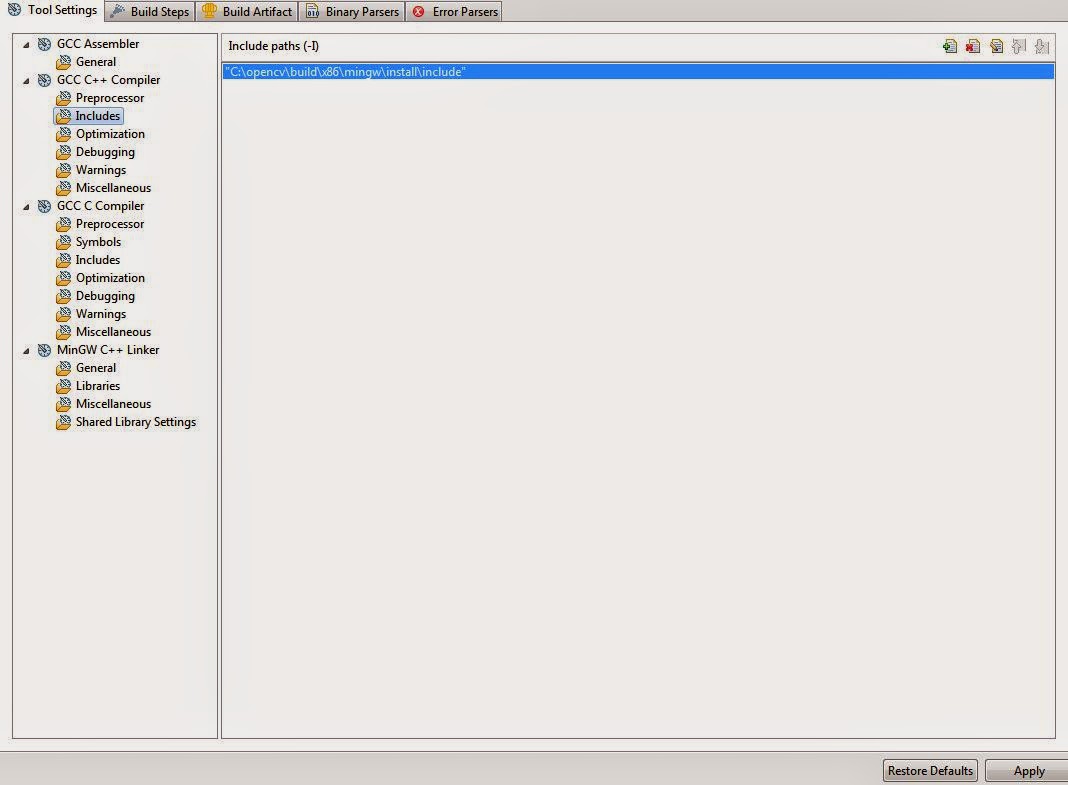
Go to...C/C++ Build > Settings.
Click on "Includes" folder under "GCC C++ Compiler".
Add "C:\opencv\build\x86\mingw\install\include" to Include paths.

Step 20:-
Now, Click on "libraries" folder under "MinGW C++ Linker".
Add "C:\opencv\build\x86\mingw\lib" to Library search path.
Add "libopencv_highgui300.dll","libopencv_imgproc300.dll", "libopencv_core300.dll", "libopencv_imgcodecs300.dll" to Libraries.
Click on OK and return to main window of eclipse CDT.

Step 21:-
Now, we have added opencv to our project.
lets check if our code works now.
Right click on project name and choose...New > Folder.
Name the folder as src.
Right click on src and choose...New > Source file.
Name the file as CheckOpenCV.cpp
Open the file.
Copy paste :-
#include <opencv2/core/core.hpp>
#include <opencv2/highgui/highgui.hpp>
#include <opencv2/imgproc/imgproc.hpp>
#include <opencv/cv.hpp>
#include <opencv2/imgcodecs/imgcodecs.hpp>
using namespace cv;
#include <iostream>
using namespace std;
int main()
{
cv::Mat image = cv::imread("C:/Users/.../workspace/OpenCVinCPP/src/error.png", CV_LOAD_IMAGE_COLOR);
if(image.empty())
{
cout<<"hello";
}
cv::namedWindow( "Display window", CV_WINDOW_AUTOSIZE );// create a window for display.
cv::imshow( "Display window", image );// show our image inside it.
cv::waitKey(0);// wait for a keystroke in the window
return 0;
}
and save the file.
Do not forget to place an image named "error.png" in the src folder of your project present in project folder in Eclipse workspace.
Step 22:-
Build the project by clicking on...Project > Build All.
Run it.
You must be able to see the error.png in a window.
Congratulations !! OpenCV has been set up correctly!! :)
OpenCV library cannot be set up on windows with the already available .exe's.
It has to be built using software like CMake.
CMake is cross-platform free and open-source software for managing the build process of software using a compiler-independent method.
To build it, MinGW has to be downloaded & installed.
MinGW (Minimalist GNU for Windows), formerly mingw32, is a free and open source development environment for Microsoft Windows applications.
Step 1 :-
Download source code of OpenCV from Github.
Link - https://github.com/Itseez/opencv
Download it as zip for v3.0.
Step 2:-
Extract its contents to opencv-master folder.
Step 3 :-
Create a folder "opencv" in C:\.
Step 4:-
Place opencv-master folder in the "opencv" folder.
Step 5:-
Download MinGW from http://sourceforge.net/projects/mingw/files/
Install it.
A folder MinGW will be created in C:\
Step 6:-
Launch MinGW.
From the options install mingw32-base and mingw32-gcc-g++.
To install, right-click on the check-boxes & click Mark for installation.
On the menu bar, click on Installation > Apply Changes.
The required compilers will be installed.
Step 7:-
In environment variable "path", add "C:\MinGW\bin"
Step 8:-
I worked with Eclipse Helios with CDT. So, you can download that too.
Once its zip file is downloaded, extract it into a folder.
Create a folder "eclipse CDT" in C:\
Place the extracted folder in "eclipse CDT".
Step 9:-
Its time to create OpenCV for Windows from its source code.
For this, CMake has to be installed.
You can download it from :-
http://www.cmake.org/download/
I downloaded cmake-3.2.2-win32-x86.exe
Install it.
It doesn't ask for anything special.
Step 10:-
Launch cmake-gui.
In the source-code folder, choose "C:/opencv/opencv-master/opencv-master"
For binaries, type "C:/opencv/build/x86/mingw"
Step 11:-
Click on configure.
It asks for compiler.
Choose Eclipse CDT4 - MinGW Makefiles.
Step 12:-
After configuration is done, the window turns reddish with some options.
Keep them as it is except -
Uncheck WITH_IPP if it is checked.
Step 13:-
Now, click on Generate.
Once it says "Generating done".
Open command prompt.
Step 14:-
Open Windows explorer & navigate to path "C:\opencv\opencv-master\opencv-master\cmake\OpenCVCompilerOptions.cmake"
Open it.
Search for "add_extra_compiler_option(-Werror=non-virtual-dtor)" and add a # before it to comment it out.
Step 15:-
Navigate to path "C:\opencv\build\x86\mingw".
Type "mingw32-make install"
This is a time taking process.
It should not throw any errors. But,if it throws any errors, please comment and ask so that I can help.
Add "C:\opencv\build\x86\mingw\bin" to path variable in environment variables.
Open windows explorer.
Navigate to "C:\opencv\build\x86\mingw\lib".
Open files "libopencv_highgui300.dll.a","libopencv_imgproc300.dll.a", "libopencv_core300.dll.a", "libopencv_imgcodecs300.dll.a" one-by-one through any text editor and save them with .lib extension to the same folder.
A successful completion of this process calls for celebration.
Step 16:-
Open Eclipse CDT.
Click on ....File > New > C++ Project.
Step 17:-
Name your project and make a blank project.
From the right, choose MinGCC compiler and click on Finish.
Step 18:-
You must be able to see some MinGW folders in Includes folder of your project.
Now, lets include OpenCV in our project.
Right click on project in the project explorer and click on properties.
Step 19:-
Go to...C/C++ Build > Settings.
Click on "Includes" folder under "GCC C++ Compiler".
Add "C:\opencv\build\x86\mingw\install\include" to Include paths.
Now, Click on "libraries" folder under "MinGW C++ Linker".
Add "C:\opencv\build\x86\mingw\lib" to Library search path.
Add "libopencv_highgui300.dll","libopencv_imgproc300.dll", "libopencv_core300.dll", "libopencv_imgcodecs300.dll" to Libraries.
Click on OK and return to main window of eclipse CDT.

Step 21:-
Now, we have added opencv to our project.
lets check if our code works now.
Right click on project name and choose...New > Folder.
Name the folder as src.
Right click on src and choose...New > Source file.
Name the file as CheckOpenCV.cpp
Open the file.
Copy paste :-
#include <opencv2/core/core.hpp>
#include <opencv2/highgui/highgui.hpp>
#include <opencv2/imgproc/imgproc.hpp>
#include <opencv/cv.hpp>
#include <opencv2/imgcodecs/imgcodecs.hpp>
using namespace cv;
#include <iostream>
using namespace std;
int main()
{
cv::Mat image = cv::imread("C:/Users/.../workspace/OpenCVinCPP/src/error.png", CV_LOAD_IMAGE_COLOR);
if(image.empty())
{
cout<<"hello";
}
cv::namedWindow( "Display window", CV_WINDOW_AUTOSIZE );// create a window for display.
cv::imshow( "Display window", image );// show our image inside it.
cv::waitKey(0);// wait for a keystroke in the window
return 0;
}
and save the file.
Do not forget to place an image named "error.png" in the src folder of your project present in project folder in Eclipse workspace.
Step 22:-
Build the project by clicking on...Project > Build All.
Run it.
You must be able to see the error.png in a window.
Congratulations !! OpenCV has been set up correctly!! :)
Your benevolence has been noted.
ReplyDeleteThx a lot for the guide!
ReplyDeleteBut...I have a problem using CMake installing the libraries. Exactly this:
[ 27%] Building CXX object modules/highgui/CMakeFiles/opencv_highgui.dir/src/window_w32.cpp.obj
C:\opencv\sources\modules\highgui\src\window_w32.cpp: In function 'int icvCreateTrackbar(const char*, const char*, int*, int, CvTrackbarCallback, CvTrackbarCallback2, void*)':
C:\opencv\sources\modules\highgui\src\window_w32.cpp:1853:81: error: 'BTNS_AUTOSIZE' was not declared in this scope
WS_CHILD | CCS_TOP | TBSTYLE_WRAPABLE | BTNS_AUTOSIZE | BTNS_BUTTON,
^
C:\opencv\sources\modules\highgui\src\window_w32.cpp:1853:97: error: 'BTNS_BUTTON' was not declared in this scope
WS_CHILD | CCS_TOP | TBSTYLE_WRAPABLE | BTNS_AUTOSIZE | BTNS_BUTTON,
^
modules\highgui\CMakeFiles\opencv_highgui.dir\build.make:187: recipe for target 'modules/highgui/CMakeFiles/opencv_highgui.dir/src/window_w32.cpp.obj' failed
mingw32-make[2]: *** [modules/highgui/CMakeFiles/opencv_highgui.dir/src/window_w32.cpp.obj] Error 1
CMakeFiles\Makefile2:2240: recipe for target 'modules/highgui/CMakeFiles/opencv_highgui.dir/all' failed
mingw32-make[1]: *** [modules/highgui/CMakeFiles/opencv_highgui.dir/all] Error 2
Makefile:159: recipe for target 'all' failed
mingw32-make: *** [all] Error 2
Thanks a lot for your help!!
Most likely you've already got your answer.
Deletehttp://answers.opencv.org/question/51987/highgui-window_w32cpp-error-tbbuttoninfo-was-not-declared-in-this-scope/
Best written guide for OpenCV on Windows + Eclipse + MinGW.
ReplyDeleteC:\opencv\sources\modules\core\src\parallel.cpp: In function 'int cv::getThreadN
ReplyDeleteum()':
C:\opencv\sources\modules\core\src\parallel.cpp:457:45: error: 'pthread_self' wa
s not declared in this scope
return (int)(size_t)(void*)pthread_self(); // no zero-based indexing
^
modules\core\CMakeFiles\opencv_core.dir\build.make:965: recipe for target 'modul
es/core/CMakeFiles/opencv_core.dir/src/parallel.cpp.obj' failed
mingw32-make[2]: *** [modules/core/CMakeFiles/opencv_core.dir/src/parallel.cpp.o
bj] Error 1
CMakeFiles\Makefile2:1500: recipe for target 'modules/core/CMakeFiles/opencv_cor
e.dir/all' failed
mingw32-make[1]: *** [modules/core/CMakeFiles/opencv_core.dir/all] Error 2
Makefile:159: recipe for target 'all' failed
mingw32-make: *** [all] Error 2
Delete**** Internal Builder is used for build ****
g++ -IC:\opencv\MinGW\install\include -O0 -g3 -Wall -c -fmessage-length=0 -osrc\sdfsadfa.o ..\src\sdfsadfa.cpp
g++ -LC:\opencv\MinGW\install\x64\mingw\lib -osdfsadfa.exe src\sdfsadfa.o -llibopencv_core310.dll -llibopencv_imgproc310.dll -llibopencv_imgcodecs310.dll -llibopencv_highgui310.dll
C:\opencv\MinGW\install\x64\mingw\lib/libopencv_core310.dll.lib: file not recognized: File format not recognized
collect2.exe: error: ld returned 1 exit status
Build error occurred, build is stopped
Hi thanks for the tutorial. Inside this path, C:\opencv\build\x86\mingw\lib. I dont have mingwc. instead i have v12. Can you help me out?
ReplyDeleteHello, an amazing Information dude. Thanks for sharing this nice information with us. Extract Ic Source data
ReplyDelete